What Is Nameserver? How to Point Domain to Hosting (Easy Guide)
So you’ve bought a domain name and signed up for web hosting. Great! But now comes the part that confuses a lot of beginners: getting your domain and hosting to actually work together.
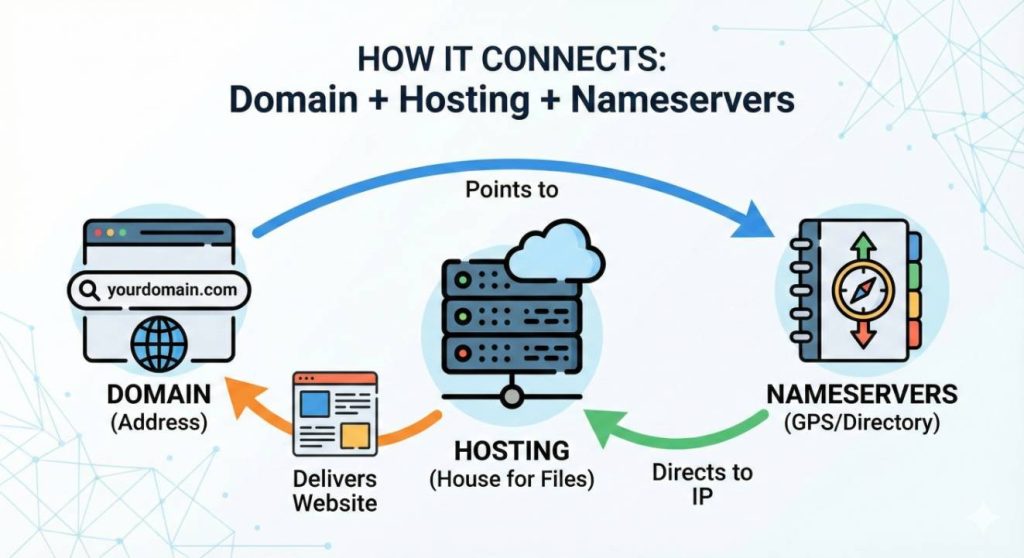
Don’t worry, it’s not as technical as it sounds. Think of it like introducing two friends who need to meet each other. Your domain is the address, and your hosting is the house. Nameservers are basically the GPS coordinates that help people find your house when they type in your address.
In this guide, I’ll walk you through everything about nameservers and show you exactly how to point your domain to your hosting. No tech jargon, just simple steps anyone can follow.
What Is a Nameserver? (Simple Explanation)
Let’s start with the basics. A nameserver is like a directory that tells the internet where your website lives.
When someone types your domain name into their browser, the internet doesn’t automatically know which server hosts your website. That’s where nameservers come in. They’re special servers that store information about where your website’s files are located.
Think of it like this: Your domain name is like a business name, and the nameserver is like the GPS coordinates or street address that tells people exactly where that business is located.
For example, when you type “example.com” into your browser, nameservers tell your browser something like “Oh, that website is hosted on a server at this specific location.” Then your browser goes to that location and loads the website.
Pretty simple, right?
How Do Nameservers Work?
Here’s what happens behind the scenes when someone visits your website:
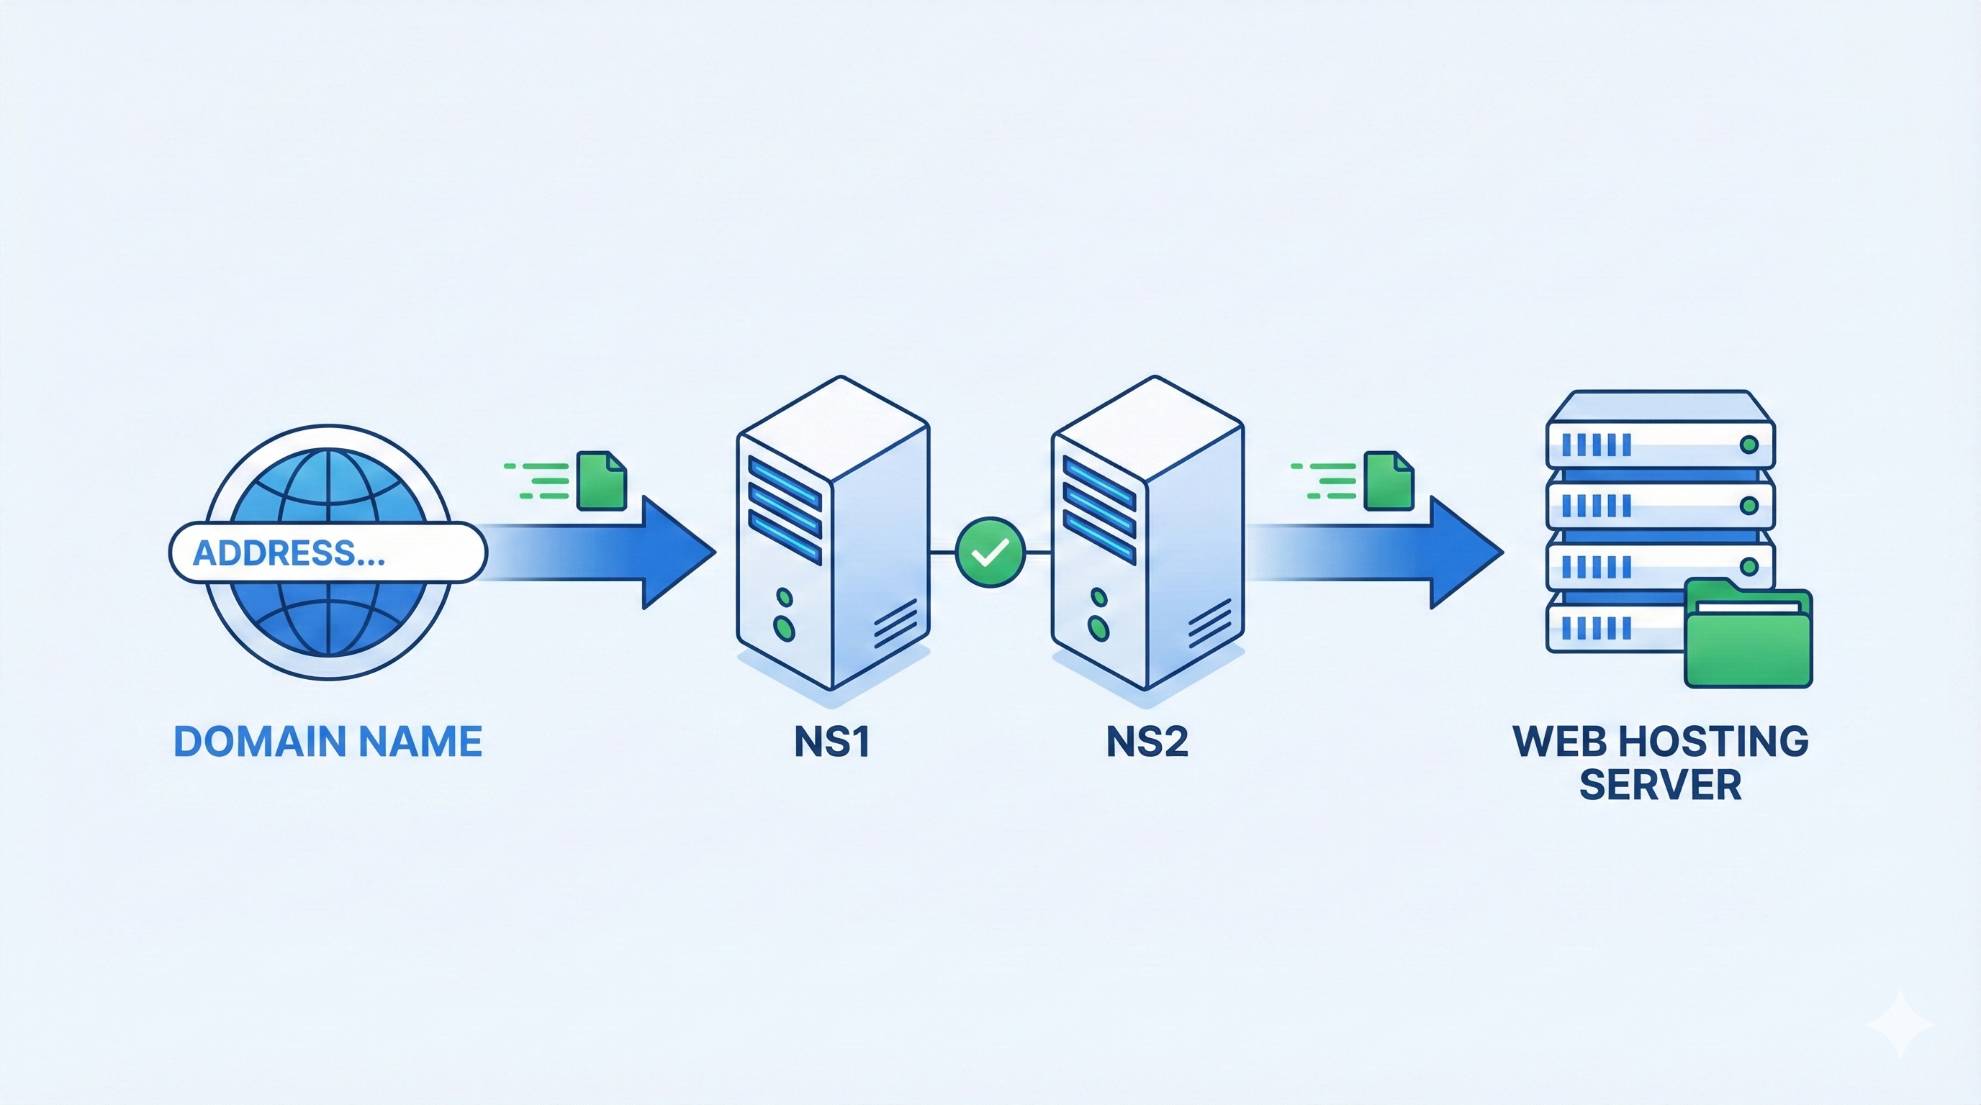
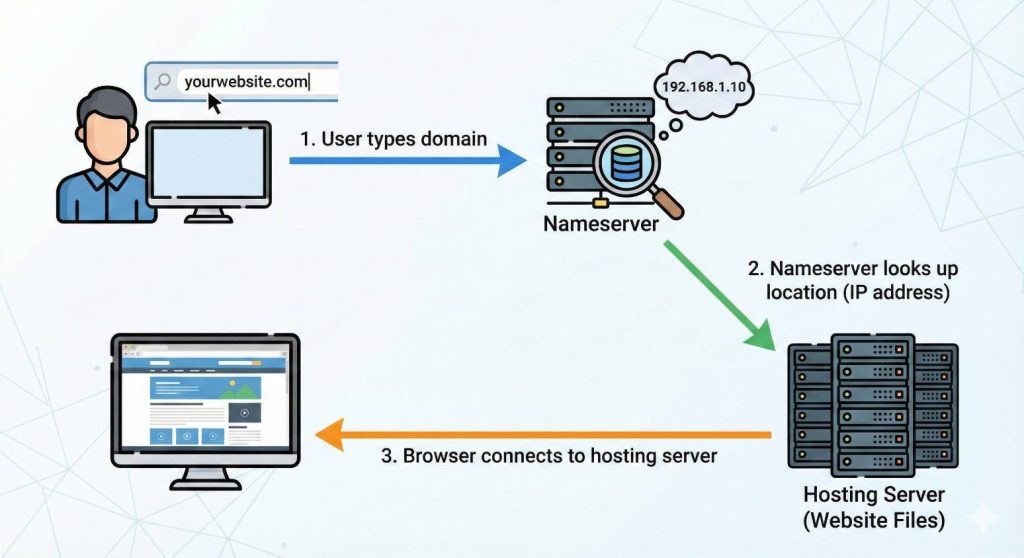
Someone types your domain name (like “yourwebsite.com”) into their browser. Their computer asks “Where is this website hosted?” This question goes to a DNS (Domain Name System) server.
The DNS server checks the nameservers associated with your domain. Those nameservers respond with the IP address of your hosting server. The browser then connects to that IP address and loads your website.
All of this happens in milliseconds. You don’t see any of it, but it’s happening every single time someone visits any website on the internet.
The cool thing is, you only need to set this up once. After that, it works automatically in the background.
Types of Nameservers
You’ll usually see two nameserver addresses when you set things up. Something like:
- ns1.yourhost.com
- ns2.yourhost.com
Why two? It’s basically a backup system. If the first nameserver is down for some reason, the second one can still direct traffic to your website. It’s like having two sets of directions to the same place, just in case.
These are called primary and secondary nameservers. Some hosting companies provide three or even four nameservers for extra redundancy, but two is the standard.
There’s also something called “authoritative nameservers,” which is just a fancy way of saying these are the official nameservers that have the final say on where your domain points.

Why You Need to Point Your Domain to Hosting
Here’s the thing: buying a domain and buying hosting are two separate things. They don’t automatically know about each other.
Your domain registrar (where you bought your domain) and your hosting provider (where your website files live) are often different companies. Even if they’re the same company, you still need to connect them.
That’s where pointing your domain to hosting comes in. By updating your nameservers, you’re telling the domain “Hey, when someone types you in, send them to this hosting server.”
Without this connection, people who type your domain name will see an error message. Your website files might be sitting on your hosting server, but nobody can reach them because the domain doesn’t know where to point.
Common situations when you need to update nameservers:
You bought your domain from one company (like GoDaddy or Namecheap) and hosting from another (like Bluehost or SiteGround). You’re moving your website to a new hosting provider. You want to use a different DNS service.
Where to Find Your Hosting Nameservers
Before you can point your domain anywhere, you need to know where you’re pointing it. That means finding your hosting provider’s nameservers.
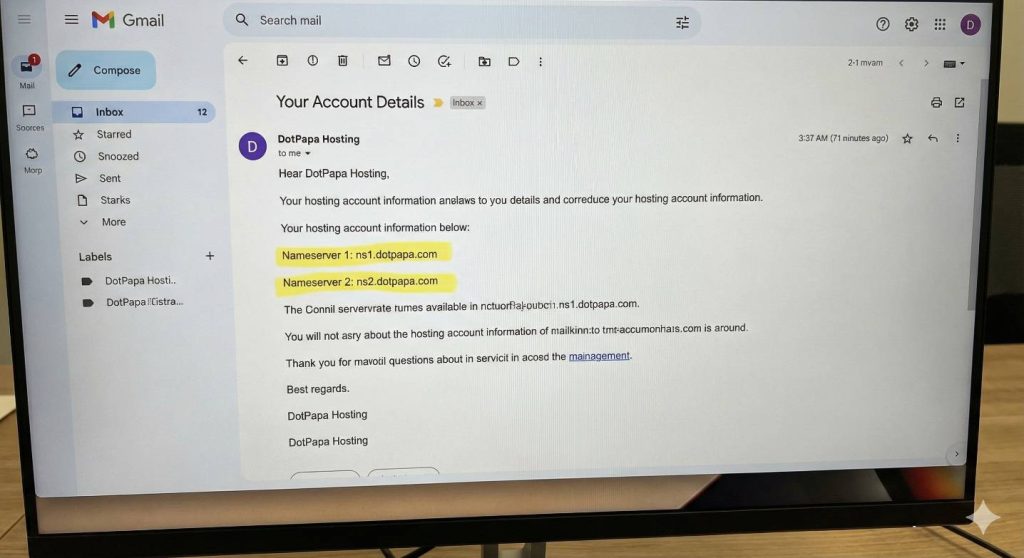
Most hosting companies send you a welcome email when you sign up. This email usually includes your nameserver information. Search your inbox for terms like “welcome,” “account activated,” or “nameservers.”
If you can’t find that email, don’t panic. You can also find nameservers in your hosting account:
Log into your hosting control panel (usually cPanel or a custom dashboard). Look for sections labeled “Account Information,” “Server Information,” or “Nameservers.” You should see something like ns1.yourhost.com and ns2.yourhost.com listed there.
If you still can’t find them, just contact your hosting provider’s support. They’ll give you the nameservers within minutes.
Here are some examples of what nameservers look like from popular hosts:
Bluehost: ns1.bluehost.com, ns2.bluehost.com
SiteGround: ns1.siteground.net, ns2.siteground.net
HostGator: ns1.hostgator.com, ns2.hostgator.com
GoDaddy: ns1.domaincontrol.com, ns2.domaincontrol.com
Step-by-Step: How to Change Nameservers at Your Domain Registrar
Now comes the main event. I’ll show you how to actually change your nameservers. The process is similar across most domain registrars, but I’ll break down the specifics for the popular ones.
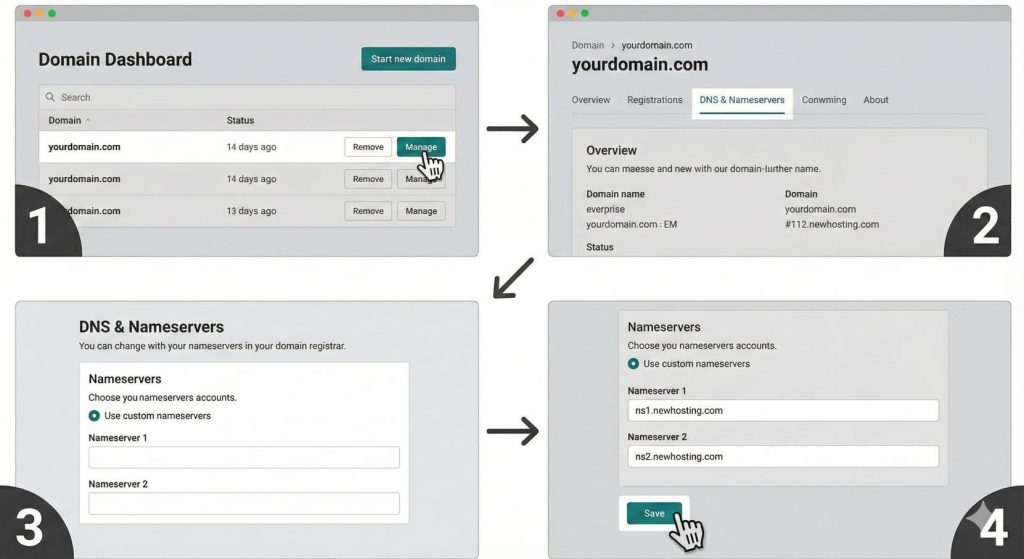
General Steps (Works for Most Registrars)
Log into your domain registrar account (where you bought the domain). Find your domain in your domain list or dashboard. Look for options like “Manage Domain,” “DNS Settings,” or “Nameservers.” Select “Custom Nameservers” or “Use Custom DNS.” Enter your hosting provider’s nameservers (usually two, sometimes more). Save the changes.
That’s the basic process. Now let’s look at specific registrars.
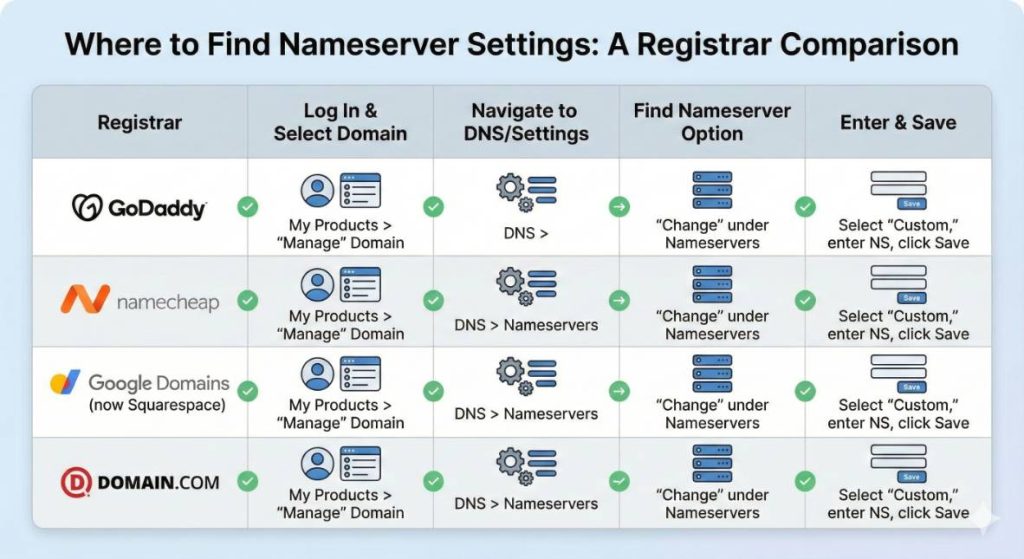
How to Change Nameservers on GoDaddy
Log into your GoDaddy account. Click on your profile icon and select “My Products.” Find your domain and click the “DNS” button next to it. Scroll down to the “Nameservers” section. Click “Change” next to the nameservers. Select “I’ll use my own nameservers.” Enter your hosting nameservers in the boxes provided. Click “Save.”
GoDaddy is pretty straightforward. The interface is user-friendly, and you should be able to find everything easily.
How to Change Nameservers on Namecheap
Log into your Namecheap account. Click “Domain List” in the left sidebar. Find your domain and click “Manage.” Find the “Nameservers” section. Select “Custom DNS” from the dropdown. Enter your hosting nameservers. Click the green checkmark to save.
Namecheap makes this process super simple. Everything is right there on the domain management page.
[IMAGE SUGGESTION 6: Add a screenshot of Namecheap’s domain management page with the Nameservers section highlighted]
How to Change Nameservers on Google Domains/Squarespace
Note: Google Domains was acquired by Squarespace, so the interface might look different depending on when you’re reading this.
Log into your Google Domains or Squarespace Domains account. Select your domain from the list. Click on “DNS” in the left menu. Scroll to “Custom name servers.” Click “Manage name servers.” Switch to “Use custom name servers.” Enter your hosting nameservers. Click “Save.”
How to Change Nameservers on Domain.com
Log into your Domain.com account. Go to “My Domains.” Click on the domain you want to manage. Click “DNS & Nameservers” in the left menu. Scroll to “Nameservers.” Click “Change Nameservers.” Select “Use Different Nameservers.” Enter your hosting nameservers. Click “Update Nameservers.”
The process is similar everywhere. Once you get the hang of it with one registrar, you’ll be able to do it anywhere.
How Long Does It Take? (Propagation Time)
Okay, so you’ve changed your nameservers. You refresh your website and… nothing happens. It’s still showing an error or the old website.
Don’t freak out. This is completely normal.
When you change nameservers, the update doesn’t happen instantly across the entire internet. It needs to “propagate” or spread to DNS servers around the world. This is called DNS propagation.
Think of it like updating your phone number in a massive phone directory. It takes time for all the copies of that directory around the world to get updated with your new number.
DNS propagation typically takes anywhere from a few hours to 48 hours. Sometimes it can happen in as little as 30 minutes, but 24-48 hours is the standard timeframe you should expect.
During this time, some people might see your new website while others still see the old one (or an error). That’s normal. Once propagation is complete, everyone will see the new website.
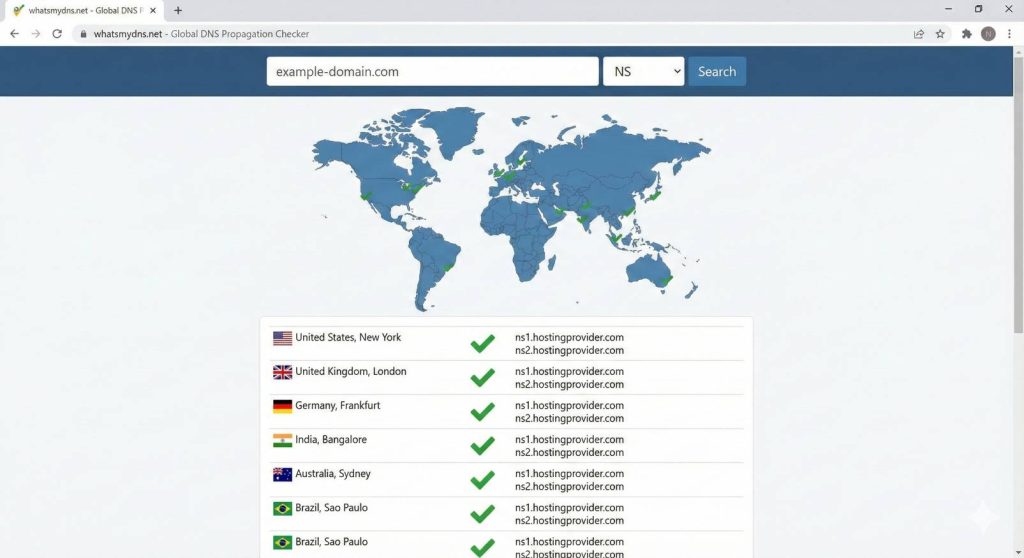
You can check the status of your DNS propagation using free tools like:
- whatsmydns.net
- dnschecker.org
- dns-lookup.com
Just enter your domain name, and these tools will show you if the nameserver changes have propagated to different locations around the world.
Common Issues and Troubleshooting
Sometimes things don’t go perfectly. Here are the most common issues people run into and how to fix them.
Website Not Loading After Changing Nameservers
If your website isn’t loading after you’ve changed nameservers and waited 48 hours, here’s what to check:
Double-check that you entered the nameservers correctly. One typo can break everything. Make sure there are no extra spaces before or after the nameserver addresses. Confirm that your hosting account is active and not suspended. Clear your browser cache and try again in an incognito window.
“DNS_PROBE_FINISHED_NXDOMAIN” Error
This error message means the DNS lookup failed. Usually, it means either the nameservers aren’t set correctly, or propagation hasn’t finished yet.
Wait a bit longer for propagation. Verify the nameservers are correct. Flush your DNS cache on your computer.
Email Stops Working
This is a common issue that catches people off guard. If you had email set up with your domain registrar and then changed nameservers, your email might stop working.
Why? Because the email DNS records (MX records) were stored with your old nameservers. Now that you’ve switched to new nameservers, those records are gone.
The fix is to add your email’s MX records to your hosting provider’s DNS settings. If you don’t know what these are, contact your email provider, and they’ll give you the records to add.
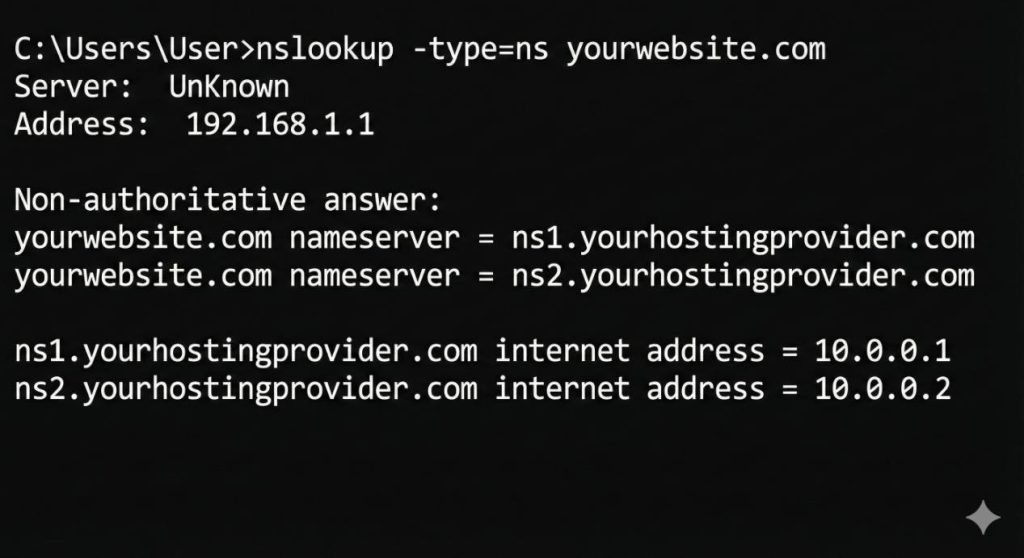
How to Verify Nameserver Changes
Want to check if your nameserver changes actually went through? Here’s a simple way:
Open your command prompt (Windows) or terminal (Mac). Type: nslookup -type=ns yourdomain.com (replace yourdomain.com with your actual domain). Press Enter.
You should see your new nameservers listed. If you see the old ones, propagation isn’t complete yet.
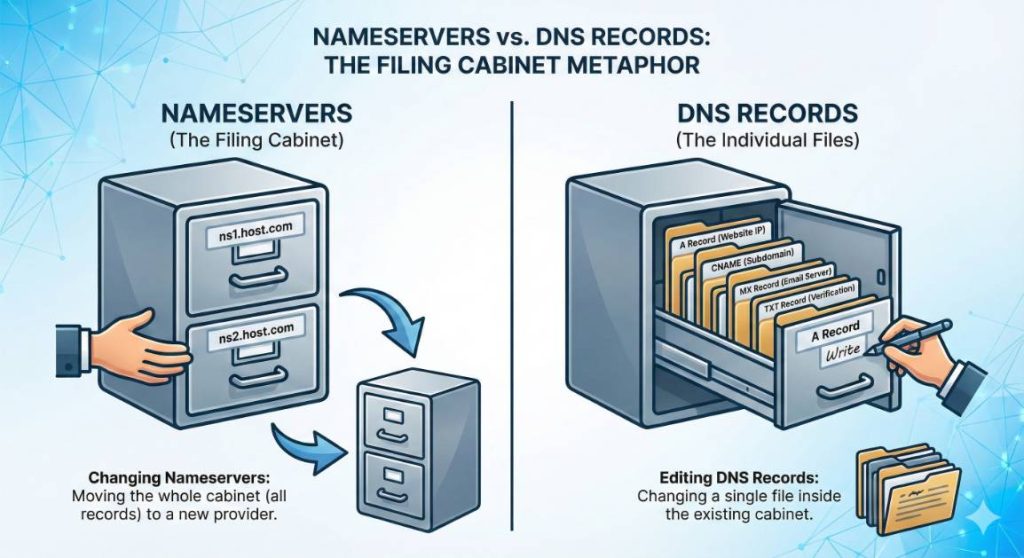
Nameservers vs DNS Records: What’s the Difference?
People often confuse nameservers with DNS records. They’re related but different.
Nameservers are the servers that host your DNS records. They’re like the filing cabinet. DNS records are the individual files inside that cabinet. They include things like A records (which point to IP addresses), MX records (for email), and CNAME records (for subdomains).
When you change nameservers, you’re changing the entire filing cabinet. All the DNS records move to the new nameserver.
When you edit DNS records, you’re just changing individual files inside the cabinet. The nameservers stay the same.
When to change nameservers: You’re moving to a new hosting provider, or you want to use a different DNS service entirely.
When to modify DNS records: You’re adding a subdomain, setting up email, or pointing specific services to different servers while keeping the main website where it is.
Most of the time, if you’re just setting up a new website, changing nameservers is all you need to do.
Frequently Asked Questions
Can I Use Custom Nameservers?
Yes. Some hosting providers let you use vanity or branded nameservers like ns1.yourdomain.com instead of ns1.hostingprovider.com. This is more advanced and usually only matters if you’re running your own hosting business or want everything branded. For regular website owners, using your hosting provider’s nameservers is perfectly fine.
Will Changing Nameservers Affect My Email?
It can, yes. If your email is set up through your domain registrar or a different provider than your hosting, you’ll need to add the appropriate MX records to your new nameservers. Otherwise, your email might stop working. Always check your email settings before changing nameservers, and make sure you have the MX records ready to add if needed.
Can I Point My Domain to Hosting Without Changing Nameservers?
Yes, actually. Instead of changing nameservers, you can add an A record that points to your hosting server’s IP address. This is useful if you want to keep some services (like email) with your domain registrar while hosting your website elsewhere. However, changing nameservers is generally simpler and more straightforward for beginners.
What If I Bought My Domain and Hosting from the Same Company?
Lucky you! In this case, the nameservers are usually set up automatically. You probably don’t need to do anything. The domain and hosting are already connected. However, it’s still worth double-checking in your account to make sure everything is properly configured.
Conclusion
And there you have it. Nameservers might sound technical, but as you’ve seen, the actual process of changing them is pretty straightforward.
To recap: nameservers tell the internet where your website is hosted. You need to update them when connecting a domain to hosting or switching hosting providers. The process takes about 5-10 minutes, but propagation can take up to 48 hours.
Once you’ve done this once, you’ll realize it’s much simpler than it seemed. The hardest part is usually just finding where the settings are in your domain registrar’s dashboard.
Now that your domain is pointed to your hosting, you’re ready for the next step: actually building your website. That’s the fun part.
If you run into any issues along the way, don’t hesitate to reach out to your hosting provider’s support team. They deal with nameserver questions all day, every day, and they’ll be happy to help you get everything sorted out.
Happy website building!